Pages

Monday, December 16, 2013

Hello You!!

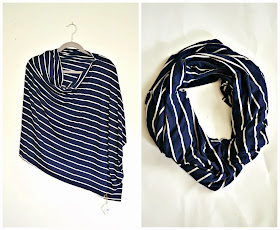
Have you seen my new design?   I decided to make something fast and chic that was very affordable to add to my inventory.  These are exactly what I have been looking for.  I am so glad that I started to make these.  They have been a hit.  Super stylish and versatile you can wear these drape cardigans as a scarf as well.  $12?  yep you got that right.  I will be adding new prints as the days and months go on.  These are a year round wear item.  Cool huh?
Now onto the other cool item down there.  The Nursing poncho.  I hate the word poncho, I need to come up with another word.  Anyway, they are a super trendy nursing blouse that allows you to nurse in public with out drawing attention to yourself.  These cute covers come in sweet colors and prints that you might wear any way.  They cover the back side of you so your back or undergarments are not showing.  These can also be worn as a shirt/blouse while your pregnant or even after baby in addition to a cool infinity scarf.  Just tuck and hide the corners.  Wanna buy one?  Hurry quick.  These are selling fast!  HEad on over to my store and get yours today!!


Friday, December 13, 2013

Mini Baby Boppy


I am having so much fun making stuff for sweet Bella Rose.  She is such a nurturer.  So when I stepped into Greyson's room to put something away and found her baby doll on my Boppy Pillow, I knew I must make her one.  I made it to fit her bigger baby that she plays with the most, not this little baby that happened to be next to me while taking pictures.


picked out 2 fat quarter fabrics, pressed them out nice and folded them in half.  I then drew the shape of half of a boppy.


Cut it out and unfold.
 

Sew around the entire thing leaving a few inches opening on one of the sides.
 

Stuff Stuff and Stuff.  Then hand sew the opening shut.
 

I love using fat quarters!


Wednesday, December 11, 2013

My Christmas wish list


Yes I'm in the Christmas mood.  Put on my fun Long Johns today from Old Navy.  And yes I did go out to lunch wearing them.  Im okay with that.  Here are just a few of the things that I have been dreaming about this season.


Monday, December 9, 2013

Burlap Noel Banner


You know you have seen these around.  I have been eyeing them for the last year.  I had some extra burlap from making my stockings and my Christmas Tree Skirt from last year so I thought "Why not? I have 30 minutes"  These kinds of quick crafts I can do and any point through out the day.  They are quick and mindless.  So my littles don't get into to much trouble.


I cut some triangles, no I didn't measure, I just eyeballed it...again its quicker, and In my opinion, the more authentic and rustic when everything isn't crisp cut even.  Instead of stenciling the letters I hand did them with a sharpie. I love the way it turned out.  It looks faded and old.


Hot glued some large hemp string on the backs


and hung.  I love it!


Friday, December 6, 2013

Baby got new Wheels


Have you ever bought one of those baby strollers from the store?  the fabric on them rips in 2.5 seconds, especially when your kids insist on sitting in it when it is meant for a baby doll?  yep, you know then.  They are made with the thinnest cheapest cotton. Ours had been broken for a while.  So since I have little more time this season, Im getting things done.  I have quite a  few fat quarters laying around and they are perfect for small projects like these.  So here is how you do it.
 
Cut your original design piece by piece.  Cut the buckle straps as close to the edges as you can.  You will be reusing these, unless you want to make new ones. 

use the old pieces as a pattern and cut your new fabric out.  On the bottom piece (the rounded one), add a couple inches to the end of it cause you will fold it under. 

Have an impromptu photo with a kid...

Take the bottom piece and  on the rounded side, pin right sides together to the bigger piece (the back side of the seat) on the bottom.

see how that under piece is folded?  that is where it will attach to the bars on the seat part of the stroller

Fold those over and press. 
 

 sew a stitch 1/8 inch fro the fold right in the center, leaving at least 2 inches on each end open.


 Starting at one end using 1/4 inch seam allowance, sew together where you have pinned, ending on the other side of the seat.


 Now using a contrasting fabric, cut some strips to make bias tape.  I cut mine about 2 inches wide and the length of the two long sides adding about 4 inches for the loops at the end, and the other the same length as the top.
To make bias tape, fold each long end 1/4 inch and press, then fold in half again and press.
 Starting with the center top piece apply your bias tape with the seat fabric inside the bias tape, pic and sew.

 Apply the long pieced bias tapes to each side with the extra length at the top.  Sew a top stitch.  add in the belt buckles when you get towards where they should go and sew them in.

 fold over the loops, pin and sew.


 add the bias tape to the bottom and the center buckle strap and pin and sew.

 Your done!  Put it on the stroller and get a rollen!  This will last you forever compared to the one that came with the stroller.  heck, I should start selling these in the shop!